Edge issues: Drip edges and water drips on the underside of components
Rusting reinforcement steel and flaking concrete on the underside of components (water drips), for example on facade elements, balconies, window sills, prefabricated concrete elements, joint edges, etc., are unfortunately still a common phenomenon. But why?
Concrete cover
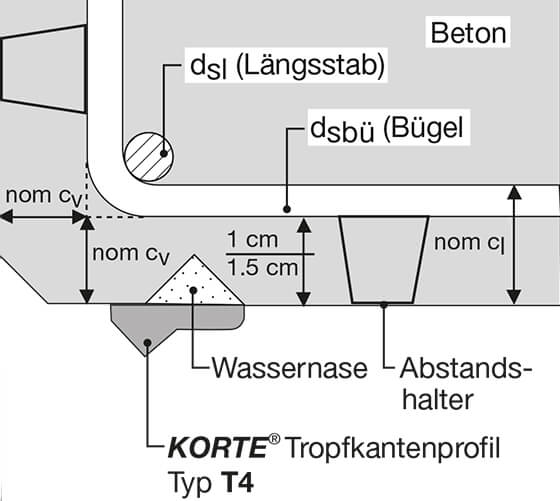
Ever since the regulations on structures made of reinforced concrete were first introduced in Germany on October 2, 1915, that is, 85 years ago, a minimum concrete cover of e > 2 cm at every point has been required for outdoor components. Today’s reinforced concrete standard, DIN 1045 (July 1988), Sec. 13.2, Tab. 10.3, prescribes a minimum dimension min c of 2.5 cm (installation dimension nom cv = min c + 1.0 cm).
he European standard Eurocode 2, Tab. 6.2, also prescribes only 25 mm, with reference to the environmental conditions (corrosion protection). These specifications on concrete cover mean that, if a water drip is formed by insertion of a triangular or trapezoidal strip with a required height of 1.5 cm, the coverage has to be increased by this value, that is, to 4.0 cm. German concrete cover directive (Merkblatt Betondeckung), March 1991, Sec. 4.8, Design of the reinforcement, states: “Moreover, the reinforcement must be specially secured with corrosion protection when its cross-section is reduced, for example, when trapezoidal strips are used…” Unfortunately, this requirement has never been and is still not complied with in concrete structures. The damage caused by this deficiency is familiar enough: flaking concrete.
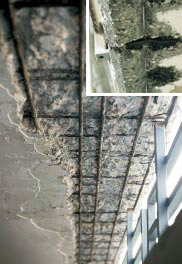 Damage after eight years on the underside of a balcony concrete sheet with no water drip or drip edge at all
Cause of damage
If concrete construction, which has been used for more then 2000 years, is done properly, additional protection of the reinforcement is not necessary because it is highly unlikely that the carbonatation depth will reach the steel reinforcements during the normal period of use of a structure of 50 to 70 years.
If concrete cover is insufficient and the carbonatation does reach the steel reinforcements, normal corrosion protection afforded by passivation of the steel by the cement ceases. Water and oxygen can reach the steel, which then corrodes and expands. This comes to light as flaking concrete. The ends of the concrete components, over which the water from the entire surface above can flow, are therefore the components most at risk because the commonly known air-borne pollutants (carbon dioxide and sulphur dioxide) can only penetrate the concrete if it is absorbent and the water stands for long enough. On non-coated concrete, you can see which areas are affected by water by their typical white colouring because the lime is washed out (efflorescence). Well compacted concrete from the formwork was removed late = little efflorescence. Poorly compacted concrete from the formwork was removed early = much efflorescence. Many and large capillaries = much lime = light-coloured concrete.
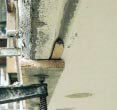 Damage to the concrete sheet of a balcony due to insufficient concrete cover. The repair illustrated where the water drip is reshaped by insertion of a triangular strip retains the weak points and will not be successful in the long term
Drip edge / water drip
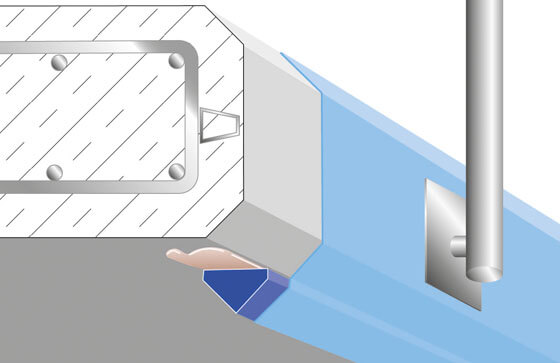
Drip edges produced by nailing a triangular or trapezoidal strip onto the formwork without increasing the concrete cover to compensate are a problem. This is a defect (planning error) that inevitably results in damage.
Spitters made of aluminium, plastic or other material, attached using plugs, cause weak points in the region of the plugs. Moreover, they have to be sealed to prevent water running between the underside of the concrete and the top of the spitter and, especially importantly, they cannot be painted. They are therefore often unsightly for users of the balcony below them, for example. Nonetheless, in some cases, spitters are effective. However, there are spitters that satisfy architects, decorators, tradesmen and home owners alike. For a number of years, spitters have been available that comply with all these requirements – for new buildings and renovations of components made of concrete, rendering, asbestos and natural stone, that is, for all absorbent and non-absorbent substrates.
 Plugged, sealed, not painted, weak point retained. Spitter shape that was previously usual on the underside.
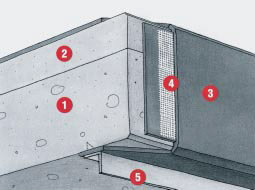
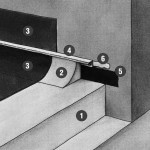
1 Reinforced concrete carrier sheet
2 Composite screed (gradient > 1.5 % towards edge)
3 Coating
4 Fabric insert
5 Plastic or aluminium bracket
The solution
Industrially prefabricated drip strips (spitters, water drips) made completely of hardened epoxy resin for gluing onto the underside of components are the ideal solution. As a comment in the contracting rules for award of public works contracts concerning concrete preservation “VOB Betonerhaltungsarbeiten”, DIN 18349 No. 4.2.21, states: “Water drip edges are required to protect surfaces. They should be located at the transition from the vertical concrete surfaces to the horizontal lower faces. […]«
Mounting of drip edges is also specified in the standard “Book of Standard Specifications”, published by DIN Deutsches Institut für Normung e.V. “The Book of Standard Specifications for Building, Work Scope 081 Concrete preservation work No.: 01.94 081 442.43.20.01″! states: “Glue drip edge over head and paint …”
These strips have a smooth surface and can simply be coated with any facade paint after gluing to disguise the fact they are attached components. There are various strips to choose from. The strips can be fastened with different adhesives, for example, with epoxy resin on prepared concrete or with polyurethane-based paintable, permanently elastic joint sealant on already painted surfaces. The concrete cover is therefore not weakened as it is with the use of plugs described above! Usually, the strips are glued after the damaged concrete has been knocked out and the surface has been reshaped, but before fine filling and smoothing, to ensure a perfect transition. Many installers use the up to 4-cm wide strips as formwork for repair. Of course, the drip edges can also be used preventatively by gluing them onto a previously sealed drip recess of the still undamaged component.
By Klaus Korte, published in the technical journal “Bausubstanz”, edition 05/2000
 Drip strip specially for renovating existing water drips. Increases concrete cover
Spitter directly glued to the bevel or edge prevents dirtying of component undersides, especially on elastic paint coats on concrete
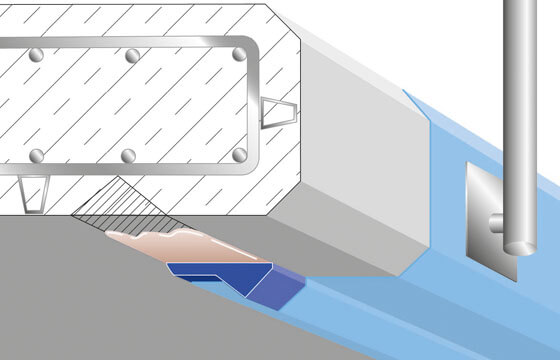
 Detail: Repair with insufficient concrete cover by grinding off the existing water drip and gluing on a drip edge
Permanently sealed: Solutions for details for floor / wall transitions
After facades, balconies and roof terraces come second in the building damage reports of the German government. Permanent sealing is still a challenge for tradesmen. It only succeeds if all details have been implemented carefully.
Components
Balconies, terraces, recessed balconies and access balconies are cantilevered, multiply supported or continuous reinforced concrete sheets. As outdoor components, they are directly exposed to the weather, and additionally subject to mechanical and chemical stress.
Loads
Climatic loads have the greatest influence. Most components located on the south side of a building are exposed to strong sunlight; rain, snow, heat and frost have a direct effect. This results in temperature fluctuations of approx. – 20 °C to + 50 °C, temperature differences in individual component layers, humidity loads and even standing water. Chemical loads results from acid rain, exhaust fumes, rotting leaves, pollen, but also due to oxidation processes on metal railings and covers, due to cleaning agents and condensation salts. Mechanical loads are caused by abrasion due to walking, moving of objects and concentrated loads from chair or table legs. The loads primarily corrode the protective layers of the component, which may be a coating or covering. Once this layer is no longer able to perform its function, water can enter and damage the structure.
Damage
Damage is not only due to the loads. Other factors such as incorporation of deficient or unsuitable materials and sloppy planning and execution of the component also result in damage. As horizontal components, these floor surfaces have to be protected from the ingress of moisture.
Coatings
Coatings must permanently resist loads. For this reason, such materials are based on polyurethane resin binders or binder combinations of epoxy resins and polyurethane resins. Dispersion binders are sometimes also used. Because of the temperature issue mentioned above and the associated length variation of the components, the coatings must be elastic and also co-ordinated with the specific properties of the various subsurfaces.
Subsurfaces
The subsurfaces for the repair may be concrete and cement screeds, ceramic tile and slab coverings, hard asphalt screeds or compressed asphalt plates, as well as elastic and rigid old coatings.
Concrete and cement screeds: do not meet all requirements of a horizontal outdoor component without an additional protective layer. To meet these requirements a multilayered structure is required. This is relatively thick in some cases and consists of different materials. For that reason, coatings with graded loadability and different surface (for example, smooth or anti-slip) properties have been developed and proven successful in practice.
Ceramic tiles or slabs: These are the most demanding and complex protective layers on balcony floors. The sealing is under the covering.
Hard asphalt screeds and compressed asphalt slab coverings: Like tiling, they require additional sealing.
Old coatings: In the past, floors have been protected with rigid or elastic coatings because of the economic and technical advantages. However, time and again, unsuitable materials have been used which did not meet the requirements for weather-proofing and crack bridging. Moreover, especially with thin-film coats, wear due to use occurred or the surfaces become unsightly over time.
For this reason, old coatings must meet two conditions. They must securely adhere to the old coatings and they must be sufficiently elastic. Experience shows that the renovation coats should be more elastic than the old coats.
Solutions for details
As with all types of sealing in construction, most loss of tightness on the object itself arises but not on flat, straight surfaces but where joints are formed. Joints with rising components, such as walls, pillars or concrete balustrades are critical. Two types of connection are possible. Which of these has to be implemented depends on the structure of the component.
Connections
Shear-resistant connection between the floor and the rising component in the case of concrete or composite screeds: The surface to be coated is shear-resistantly connected to the load-bearing reinforced concrete sheet so that no problematic movements occur.
Non-shear-resistant connection between the floor and rising component on a floating screed or screed on a separating layer: In this case, the screed and reinforced concrete sheet can move relative to each other. This also applies to the transition of the coating to a composite thermal insulation system or recessed balcony structures whose load-bearing concrete sheet is not connected to the storey ceiling.
Floor coatings are sealing layers. When connecting rising components, DIN 18195, Part 5 “Water-proofing against non-pressing water” prescribes that the sealing layer must be 15 cm above the upper edge of the complete covering. However, 15 cm are almost impossible to comply with in practice. For “work on existing building”, the coating should, however, be at least 5 cm.
The right-angled bend between the floor and the wall must be rounded by forming a fillet. In this way, the coating film continues through evenly, which considerably increases the endurance of the balcony coating.
Fillets
Clarification or the decision on whether to implement a shear-resistant or non-shear-resistant connection when installing a fillet is often underestimated. Shear-resistant installation is rare. In this case, there must be no movement at all between the reinforced concrete sheets and composite screed or between the composite screed and the rising wall.
Whether a screed is a composite screed or has been laid on a separating layer can be seen by the crack between the screed and the rising component.
A shear-resistant connection means that the installed fillet is permanently glued to the floor and wall. It is unimportant whether the upper edge of the fillet has been installed with or without an end section. Installation of a fillet with a non-shear-resistant connection is more common, that is, the fillet is not glued to the wall.
To ensure the balcony coating remains free of cracks, the fillet should be permanently connected to the screed, that is, to the subsurface. If this is not the case, a crack will form in the transition from the floor coating to the fillet coating after a very short time. A shear-resistant connection can most simply be achieved with an epoxy resin adhesive or a solvent-free epoxy resin primer, which is applied before the coating.
A gap should be formed between the fillet and the wall. The width of the gap is based on the ability of the screed to expand. It should be approx. 10 mm wide (+/- 5 mm) and sealed to a depth of at least 2 to 3 cm. This can be achieved with a permanently elastic sealant (for example, polyurethane based). Insertion of a round cord or a back filling moulding reduces the gap depth to be filled and prevents three-side adhesion of the sealant.
Because it is difficult to form the fillet by hand with epoxy-resin-based filleting mortar or plastic-modified cement mortar and the manual skills are often no longer available, concave mouldings from various suppliers and with various dimensions are offered and installed.
 Installing a concave moulding made of reaction resin mortar in the case of a composite screed
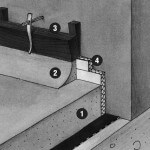
1 Composite screed
2 Fillet made of EP mortar
3 Coating
4 End section
5 Rot-proof adhesive strip
6 Permanently elastic compound
 Installation of a concave moulding made of reaction resin mortar in the case of a screed on a separating layer
1 Screed on separating layer
2 Fillet made of reaction resin mortar
3 Stop for upper edge of the fillet
4 Filling material for forming gap (will be removed later)
Fillets formed with mortar
For proper installation of the fillets with mortar, it is important to ensure the filling mortar does not adhere to the rising component between the floor and the moulding. This is done using a rot-proof adhesive. The upper edge of the fillet must in any case be bevelled downward towards the floor. The best way is to place a square length of wood at the required height to act as a stop (see figure). The required inclination of the upper edge of the square wood is achieved by inserting a wedge. The coating must then be pulled in over the edge of the fillets as far as the joint edges.
Prefabricated concave mouldings
Epoxy-resin-based prefabricated concave mouldings are, of course, much easier to install. The concave moulding is normally shear-resistantly connected to the primer previously applied to the floor, having prepared the subsurface. Before the concave moulding is inserted, the PU compound for sealing the interstice can be applied to the vertical leg of the moulding so that the interstice between the concave moulding and the wall is glued and sealed in one step. After the primer has cured to provide a shear-resistant connection, the floor and concave moulding can usually already be coated the very next day.
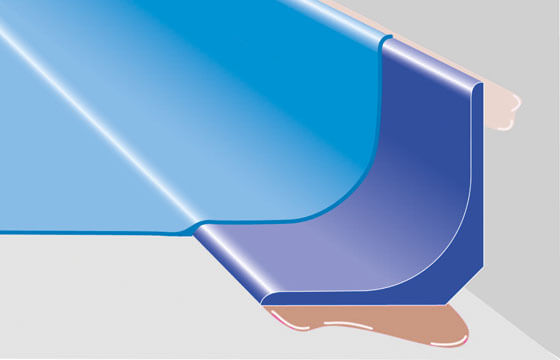 Prefabricated concave moulding made of polymer resin, fillet
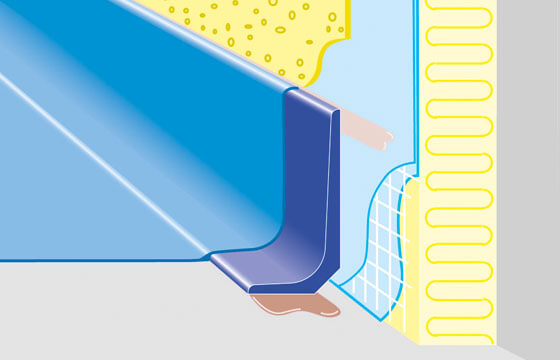 Floor/wall transistion with ETICS: Shear-resistent connection on floor with epoxy resin, non-shear-resistant connection between wall and moulding with PU compound
 Prefabricated concave moulding made of polymer resin for tiled wall and coated floor surface